Let them eat pie! Oh, that was cake, not pie, but yes, we should all be able to enjoy pie on Thanksgiving. Not just any pie, but a delicious and decadent pie that makes us feel like we never had to give up any food groups.
I have had some version of pumpkin pie on Thanksgiving for nearly all my gluten-free years. Since I was never a baker when I went gluten-free, and the thought of making my own pie crust terrified me, I looked for a pre-made gluten-free pie crust. I found one, surprisingly, and used Libby’s premixed filling and a can of condensed milk for the filling (Back in the very beginning of my gluten-free life, I could still tolerate dairy). The pie was good but not great, but at least I had pie.
When I had to eliminate dairy from my life, I struggled to replace the condensed milk, not knowing at the time that it really was not needed. I have since learned you can use any milk, even heavy cream, and not what the Libby’s can says you must use.
As the years went by, I started baking in earnest, but mostly savory recipes such as pizza and bread. I did not dip my toes into sweets for a very long time and instead continued to use a frozen gluten-free crust, but I did create my own filling recipe.
A few years ago, I felt brave and started using Bob’s Red Mill Pie Crust mix. I had to mix and roll out the dough, and after a few tries, I succeeded. The crusts were much better than the store-bought crusts, and I loved my filling recipe.
But this year, I felt it was time to create my own pie crust recipe from scratch. I made a ton of pies in my quest to create a flaky, flavorful crust. I tweaked my filling recipe too. In the end, I was able to eat a deliciously decadent pumpkin pie that reminded me of the pumpkin pies of my pre-gluten and dairy-free life. I am so thrilled to share it with you.

I am going straight with you upfront: gluten-free pie crust, mine or anyone else’s, is not easy to make. I don’t mean to scare you, and I hope I don’t, but rather, I want to know going in that this will be a challenge. And, once you eat your pie, you will be so happy you accepted the challenge.
Both my recipe and my video are designed to guide you each step of the way and eliminate questions like these:
- What should my dough look like once I cut in the fats?
- What does the dough “coming together” mean, and what does it look and feel like?
- How easy or hard will it be to roll out the dough?
- What if the dough falls apart?
When making pie crust, I am less concerned with the visual appeal, although that is important, than with the taste and performance of the crust and filling. I like my crust to look good, but I am not a perfectionist about it. I have learned that in gluten-free baking, you cannot expect aesthetic perfection, and that is okay. Keep this in mind as you make your crust.
If you have any questions or comments about making pie crust or pumpkin pie, please message me HERE, and I will respond within 24 hours.
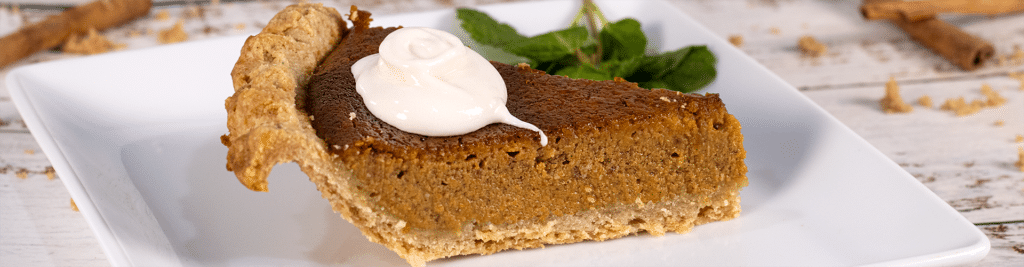
Oh, and about the whipped topping in the photo: see the note at the end of the recipe about Truwhip and what we added to it.
NOTE: This recipe is for TWO pies. If you want to make only one pie, half the recipe.
Happy Thanksgiving!
Now, go eat something amazing!

Gluten-Free Decadent Pumpkin Pie
Suggested Tools
The Ingredients
Dry Flour Blend
- 105 grams white rice flour
- 105 grams sorghum flour
- 210 grams tapioca flour
- 25 grams granulated sugar
- 2 grams xanthan gum
- 4 grams baking powder
- 4 grams kosher salt
Wet Ingredients
- 140 grams Earth Balance Buttery Spread, 11 tbsp, cold
- 96 grams Vegetable Shortening, 8 tbsp, cold
- 5 grams distilled white vinegar
- 1 large egg, slightly beaten
- 9 tbsp water, ice cold
Pumpkin Filling for TWO Pies (half if making only one pie)
- 2 15 oz pumpkin puree
- .5 cup granulated sugar
- 1 cup light brown sugar, packed
- 2 tsp cinnamon
- 2 tsp vanilla
- 1 tsp ground ginger
- 1 tsp kosher salt
- .5 tsp ground nutmeg
- .5 tsp ground clove
- 1.5 cups Ripple 1/2 & 1/2, or similar dairy-free creamer
- 4 large eggs
- 2 large egg yolk
The Process
Mise en Place
- Get your food processor set up and ready with the blade attachment. You will also need a digital scale, plastic wrap, and large bowl to finish mixing the dough in.
- Fill a 1 cup measuring cup with a few cubes of ice and cold water. Set aside.
The Flour Blend
- Measure and add all the dry ingredients to a small mixing bowl and mix to combine with a whisk. Once combined, transfer to the bowl of the food processor.
The Wet Components
- Measure the vinegar into a small prep bowl. Add the egg and beat slightly. Set aside.
- Measure the shortening into a bowl. Cut the Earth balance into pieces (about a tablespoon) and measure into a bowl.
- Add the shortening and the Earth Balance to the food processor and attach the top. Pulse 10 times (about a second each pulse). Remove the top and check to see the size of the pieces of Earth Balance and shortening in the flour mix. The goal is pea sized. Keep pulsing for 5-7 more pulses and check again. You may need up to 20 pulses. When the fats in the flour mix are about pea-sized, add the egg and vinegar and pulse 5 times.
Finishing the Dough Mixture
- Transfer the dough in the food processor to a large bowl. Bring your measuring cup with the ice cold water near you. Spread out a strip of plastic wrap next to you.
- Add 5 tablespoons of water to the dough in the bowl and begin to mix and press gently with your hands. You will start to feel the dough getting wetter and coming together slightly. Add 3 more tablespoons of water and keep mixing gently as the dough comes together even more. If the dough is still quite crumbly, add a tablespoon of water at a time until the dough starts to stick together. You will want a consistency that is more wet than dry but still a bit dry.
- When you believe your dough has fully come together, start to form it into a ball. You will be creating two balls. Each one will be about 400 grams each. The process of creating the ball will be challenging as some of the dough is still a bit dry and that is okay. A dough that is too wet will stick when rolling out.
- When you think you have about half of the dough formed into a ball, you can measure it on the digital scale or just go for it if you think you eye-balled it well. Set ball on the plastic wrap and then create the next ball. I like to keep the first ball on the wrap while I make the other one just in case I need to add or remove dough from the first ball to make each ball even. I am a bit of a perfectionist about it.
- Once you good with the size of each dough ball, cover the first dough ball that is on the plastic wrap and then push down on the ball to start creating a disc of dough. Wrap the the disc completely and press and form into a disc even more. Set aside and do the same for the other dough ball. When both are finished, place in the fridge to chill for one hour.
Rolling the Dough
- Before you start rolling the dough, preheat your oven to 425 degrees.
- Remove one dough disc from the fridge. Cut two equal-sized sheets of parchment paper, large enough to accommodate a 10-inch pie crust and place one sheet on the counter. Unwrap the dough disc and place in the middle of the parchment paper. Place the second sheet of parchment paper on top.
- Start the rolling by placing your rolling pin in the middle of the disc and moving outward in one direction. You will not be putting a lot of pressure on the pin at this stage. Work round the dough in a circle to roll out evenly. Always start in the middle of the circle and roll out, but not to the edge of the dough. If you do that, the dough will become way too thin on the edges.
- After rolling for a bit, pull off the top parchment and look at your dough. If the edges are crumbly or the circle is misshapen, pull dough from the edges and move inside the circle, replace the parchment and keep rolling. You may have to repeat this step several times. As the dough rolls out more, you may need to add more pressure, especially in the middle of the dough. Do so, but not too much pressure.
- Once you have rolled out the dough to about an inch wider than your pie plate, remove the top parchment. Place the pie plate in the center of the dough and flip the plate and dough. Make sure you are still centered and gently start removing the parchment. DO NOT push the dough down into the the pie plate before you remove the parchment. You may need a thin spatula or butter knife to coax the dough from the parchment at the edge. If some of the dough breaks off, do not worry. Add it to a pie to be used for "mending" later.
- After you have removed the parchment, gently, push the dough down into the pie plate. Now, access your the amount and shape of the dough on the edges. Begin to form the crust but pushing the dough around. You will want to press and move the dough upward to create a higher crust. Pull off any excess dough falling down the side of the pie plate and add the pile you started earlier. If you have some section of the outer crust that need more dough, use some from your pile. The warmth of your hands will help you manipulate the dough. If it gets too sticky, have a bowl of hot water nearby to dip your fingers into. You don't want too much water on the dough so be careful.
- Once you are satisfied with your dough, put the pie plate back in the fridge to chill down. If you are making two pies, repeat the same procedure for the next pie crust and when finished place that crust in the fridge. If you making just one pie, leave the other dough disc in the fridge for now and put in the freezer later.
Mix the Filling
- While the pie crusts are chilling, you will be mixing the filling. Measure and add all the ingredients EXCEPT the Ripple (or the dairy-free milk you are using) to a large bowl and mix well with a whisk. Slowly add the Ripple and mix until well combined. I like my pie filling a bit thicker so I only use .75 cups of Ripple per pie, but if would like you pie filling less thick, use a bit more Ripple.
- Remove your crusts from the fridge and pour an equal amount of filling into each crust.
Baking the Pies
- Place each pie on a separate rack in the oven and bake for 15 minutes at 425 degrees.
- After 15 minutes, reduce the temperature to 350 degrees and bake for 45 minutes. If baking two pies, you will want to rotate them after 20 minutes or so. After they have been baking 45 minutes at 350, insert a toothpick to check their if they are done. The toothpick will come out clean when they are done. If the toothpick is not clean, bake longer, and check again to until done.
- Cool to room temperature and serve or refrigerate for later. Store leftover pie in the fridge, covered, for up to three days. Enjoy!
Dairy Free "Cool Whip"
- We found a dairy-free whipped topping at our local Kroger, Truwhip. It was fairly good out of the package but we added 1/2 tablespoon each of vanilla and honey to the entire tub, mixed well, and refroze. It was delicious!!