Before GF, I loved calzones, especially the delicious, crispy on the outside, chewy on the inside dough. I think I loved the dough more than the filling!
Since GF, I have never found a store-bought frozen gluten-free calzone, nor have I encountered a restaurant serving a gluten-free calzone. And if I wanted to find a gluten-free AND dairy-free calzone, I would be completely out of luck. That’s not to say they don’t exist somewhere, but I have not found them yet. So, like we always do, we made our own.
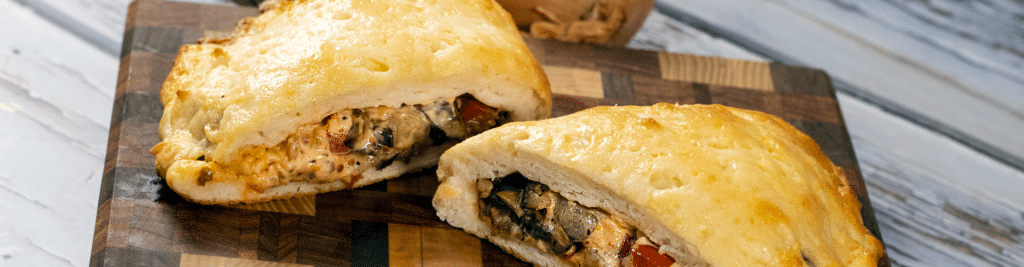
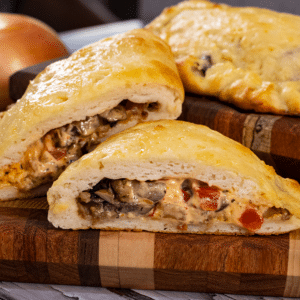
Our calzones are made from our pizza dough and are crispy on the outside and chewy on the inside. For this recipe, I focus on a dairy-free version featuring a decadent, creamy sauce, Italian sausage, veggies, and black olives. Rich makes his calzone dairyful with similar ingredients and replaces the sauce with a combination of whole and skim mozzarella.
For your calzones, use the fillings you love. Use Mozzarella, or use cheddar, or whichever cheese you like. If you’re dairy-free, use my sauce or a ranch or a sauce you create. Or, you can use dairy-free cheese. This is your calzone, and make it as you wish. As with pizza, there are many combinations that will work, so make what you love.
If you have any questions about the calzone-making process, please message me here, and I will respond within 24 hours.
And, for calzone filling ideas, be sure to check out our Pizza Toppings Matrix, Homemade Pizza Sauce Recipe, and our
Ranch Dressing Recipe.
Now, go eat something amazing!

Gluten-Free, Dairy-Free Calzone
Suggested Tools
The Ingredients
Dry: Flour and Starch
- 308 g rice flour, White
- 172 g Tapioca flour
Dry: Supplemental
- 40 g soy milk powder
- 12 g xanthan gum
- 10 g gelatin, unflavored
- 2 g baking powder
- 31 g sugar, granulated
- 11 g kosher salt
Wet Ingredients
- 45 g sunflower oil, Healthy Harvest Brand
- 136 g egg whites , (100%, no fillers) Kirkland brand from Costco
- 8 g distilled white vinegar
Yeast and Water
- 9 g dry active yeast, NOT instant
- 1.75 cups carbonated water, you may need more water than 1.75 cups depending on the area you live
Dairy Free Sauce
- 1/4 cup mayonnaise
- 1 tbsp Pizza Sauce
- 1 tbsp Simple Truth Plant Based Sour Cream
- 1/2 tsp onion powder
- 1/2 tsp Nutritional Yeast Flakes
- 1/4 tsp oregano, dried
- Kosher salt and pepper to taste
Dairy Free Filling Ingredients
- 1 lb Italian sausage, cooked
- 1 medium red pepper, sliced
- 1 medium onion, sliced
- 1 clove garlic, minced
- 1/2 cup mushrooms, sliced
- 1/2 cup black olives, sliced
Dairyful Filling Ingredients
- Replace the dairy-free sauce with half Whole Mozzarella and half part-skim Mozzarella.
The Process
Prepare the Dairy Free Filling
- Slice the red pepper, mushrooms, and onion and add to a prep bowl. Mince the garlic and add to a prep bowl. Slice the black olives and add to a prep bowl.
- Add the Italian sausage to a skillet set to medium-high and cook until done. Remove from the pan to a paper towel-lined plate and set aside. Add the red pepper, mushrooms, and onions to the skillet and cook until nearly softened. Add the garlic an cook for about 2-3 more minutes. Remove skillet from the heat and transfer the veggies to a bowl. Set aside.
- For the dairy-free sauce, in a small bowl, combine all the sauce ingredients and mix well. Set aside.
Mise en Place for the Dough
- Prepare for baking by setting out your tools: bowls for measuring, mixer, plastic wrap, parchment paper, sheet pans, carbonated water (or soda stream), 8" round to make circles, whisk, measuring cup, mixer with paddle attachment, non-stick spray, scooper, and spatula.
Prepare and Preheat the Oven
- Rearrange the two racks in the oven so that the top rack is about in the middle. If using a pizza stone, set it on the top rack before preheating the oven. Set your oven to 400 degrees.
The Dry Ingredients
- Set your digital scale to grams and make sure the Tare (clear) after you set the bowl on top of the scale. Measure the rice flour and tapioca into the stand mixer bowl. Measure and add the supplemental ingredients to the same bowl as the flours. I use a small bowl to measure the supplemental ingredients and then add them, one by one, to the mixing bowl.
Measuring the Wet Ingredients
- Measure each of the wet ingredients and then put in a small bowl. You can measure them into one bowl, hitting tare after each ingredient or you can measure each into a separate bowl. If you measure each in separate bowls, combine all the wet ingredients into one bowl when done measure all three.
Measure the Yeast
- Using a small bowl and a kitchen scale set to grams, measure out 8g of dry active yeast. Make sure the Tare (clear) after you set the bowl on top of the scale.
Prepare the Water
- If you are using a Soda Stream for your water:As the warm water is flowing from the facet, put a probe thermometer in the stream and when it reaches a steady 110 degrees, fill your Soda Stream bottle and then carbonate the water using the Soda Stream.Add 1.75 cups of the carbonated water to a 4 cup measuring cup.
- If you are using Club Soda for your water:Add 1.75 cups of Club Soda to a 4 cup measuring cup, preferably glass.Microwave for 3 minutes, then temp the water using a probe thermometer. Heat longer if needed to bring the Club Soda to 110 degrees.
Activate the Yeast
- When you have your 110-degree water ready, begin whisking the water as you add the yeast slowly to the water. Keep whisking until nearly all the yeast has dissolved. You should see foam when you do this. If you do not, your yeast may be out of date or bad.
Time to Mix and Proof (Rise)
- Attach the mixing bowl to the stand mixer, attach the mixer's paddle attachment and raise the bowl into the mixing position. Set to speed 1 for 15 seconds to combine the dry ingredients. Add the wet ingredients while the mixer is still set at speed 1. Now, add the yeast and water slowly. Once it is all added, increase the speed to 2 until all the water is incorporated into the dry ingredients. Increase the speed to 4 and mix for three minutes.
- If the dough appears dry, lower the speed of the mixer and add a bit of water.
- When the mixing is complete, the dough should be soft and silky, similar to frosting. Lower the bowl and remove the paddle attachment. With a wet spatula, scrape the dough from the sides of the bowl. Cover the bowl with plastic wrap and set it on the top of your stove for 20 minutes (oven is on and set to 400 degrees).
Make the Circles While the Dough is Rising
- Cut four pieces of parchment paper large enough to accommodate the circle you will be creating. Using the curly side up, trace the 7-8" bowl, dish, or similar with a sharpie, remembering to add a checkmark so you can tell if the sheet has been flipped. Place the parchment papers with the side you traced the circle face down in a pile and set aside.
Scooping and Filling the First Two Calzones
- Move the bowl of dough to your work area and turn on your scale, set to grams. Put a small bowl on top of the scale and tare to zero. Spray the bowl you will be scooping into, the spatula, and the scooper with non-stick spray. Have a bowl of hot water nearby to dip your hands into.
- Before starting to scoop your first calzone, move one of the circle sheets to your work area and spray with non-stick spray.
- Start scooping the dough into the bowl on top of your scale until you reach 200g. If you need to take the dough out of the bowl on the scale, wet your hands before touching the dough.
- With wet hands, pick up the dough ball and manipulate in your hands to make the dough ball more compacted. Using both hands, "throw" the dough ball down in the middle of the circle on the parchment paper.
- Slowly, using one hand with a light touch, spread the dough to extend right up to the circle. You can use two hands if you like. Once the dough is spread, run your hand over the top surface to smooth out any unevenness.
- Fill the calzone with your toppings, starting with the sauce and then adding the meat and veggies, keeping the filling about 3/4-inch from the edge closest to you and extending just beyond the middle of the dough. Keep the filling about 3/4-inch from the sides. Add a bit more sauce to the top of the filling.
- When done adding filling, grab the parchment paper further away from you fold toward you, leaving about 3/4 to 1/2 inch to the edge of the bottom dough. Gently separate the dough from the parchment paper and let fall onto the toppings.
- Using a spatula, or your fingers, fold the bottom layer of dough over the top layer of dough, closing the calzone. Then, gently press down on the dough with your finger or thumb, securing the seal all the way around.
- With a sharp knife dipped in water, make two to three shallow scores on the top of the calzone to allow venting while baking. This step is optional. Trim the excess parchment paper around the calzone and set on a sheet pan on top of the stove.
- Scoop and form the second calzone in the same way. Place both calzones on the pizza stone in a 400 degree oven for about 16 minutes or until you achieve your desired level of doneness or color.
Scooping and Forming the Last Two Calzones
- While the first two calzones are baking, and using the same process as the first two calzones, form the next two. By the time you are done, the first two crusts should be ready for the oven. If not, place the sheet pan of calzones on top of the stove.
Slice and Enjoy!
- One the calzones are out of the oven, remove them to a cooling rack and discard the parchment. Brush with olive oil if you like and let cool for 5 or so minutes. Slice and enjoy! Try dipping your calzone, especially the dairyful version, in our pizza sauce. It's delicious!!