The French Bread Baguette has been one of the hardest recipes to perfect. Temperamental and obstinate, they have fought me for years, but in the end, I won.
French bread was my favorite baked product before I had to go gluten-free. I would regularly head to the grocery store at 4 pm to grab a loaf of freshly made bread. Many times, I never made it home before half of it was gone.
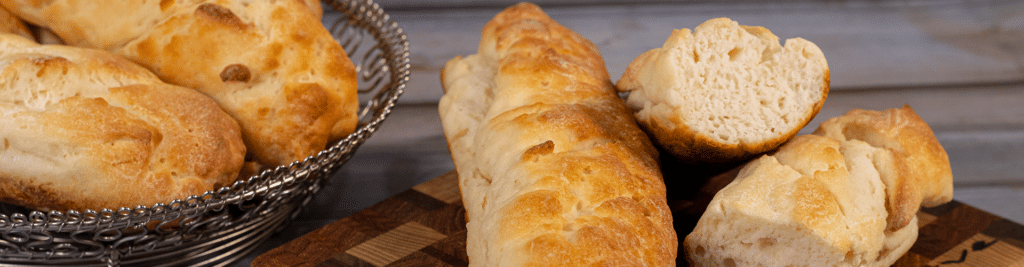
Of all the gluten-free baked goods I now make, this one is my favorite. I cannot get enough of the flavor and texture of this bread. And it is so versatile. From sandwiches to French toast, you can really expand your food horizons with these baguettes.
If you have been missing French bread, now you can enjoy a gluten-free French bread baguette that’s crispy on the outside with a fantastic chewy inside, and a flavor so close to the “real” thing you’ll think there’s been a mistake.
I hope you enjoy these as much as I do. And watch the video to discover my favorite way to eat these delicious baguettes.
If you have any questions about making the baguette recipe, please message me HERE, and I will respond within 24 hours.
Now, go eat something amazing!


Gluten-Free French Bread Baguettes
Suggested Tools
The Ingredients
Dry: Flour and Starch
- 275 g rice flour, White
- 200 g Tapioca flour
Dry: Supplemental
- 35 g soy milk powder
- 12 g xanthan gum
- 8 g gelatin, unflavored
- 15 g baking powder
- 29 g sugar, granulated
- 13 g kosher salt
Wet Ingredients
- 70 g sunflower oil, Healthy Harvest Brand
- 120 g egg whites , (100%, no fillers) Kirkland brand from Costco
- 11 g distilled white vinegar
Yeast and Water
- 11 g dry active yeast, NOT instant
- 1.75 cups carbonated water, you may need 2 cups water if you live in a dry climate
The Process
Mise en Place
- Prepare for baking by setting out your tools: bowls for measuring, mixer, parchment paper, French bread pans, carbonated water (or soda stream), 10" round to make circles, whisk, measuring cup, mixer with paddle attachment, non-stick spray, scooper, and spatula.
Prepare and Preheat the Oven
- Preheat your oven to 400 degrees. Make sure your racks have enough space between them to easily accommodate two racks with a baking pan on each one.
The Dry Ingredients
- Set your digital scale to grams and make sure the Tare (clear) after you set the bowl on top of the scale. Measure the rice flour and tapioca into the stand mixer bowl. Measure and add the supplemental ingredients to the same bowl as the flours. I use a small bowl to measure the supplemental ingredients and then add them, one by one, to the mixing bowl.
Measuring the Wet Ingredients
- Measure each of the wet ingredients and then put in a small bowl. You can measure them into one bowl, hitting tare after each ingredient or you can measure each into a separate bowl. If you measure each in separate bowls, combine all the wet ingredients into one bowl when done measure all three.
Measure the Yeast
- Using a small bowl measure out 11g of dry active yeast.
Prepare the Water
- If you are using a Soda Stream for your water:As the warm water is flowing from the facet, put a probe thermometer in the stream and when it reaches a steady 110 degrees, fill your Soda Stream bottle and then carbonate the water using the Soda Stream.Add 2 cups of the carbonated water to a 4 cup measuring cup.
- If you are using Club Soda for your water:Add 2 cups of Club Soda to a 4 cup measuring cup, preferably glass.Microwave for 3 minutes, then temp the water using a probe thermometer. Heat longer if needed to bring the Club Soda to 110 degrees.
Activate the Yeast
- When you have your 110-degree water ready, begin whisking the water as you add the yeast slowly to the water. Keep whisking until nearly all the yeast has dissolved. You should see foam when you do this. If you do not, your yeast may be out of date or you did not carbonate your water.
Time to Mix and Proof (Rise)
- Attach the mixing bowl to the stand mixer, attach the mixer's paddle attachment and raise the bowl into the mixing position. Set to speed 1 for 15 seconds to combine the dry ingredients. Add the wet ingredients while the mixer is still set at speed 1. Now, add the yeast and water slowly. Once it is all added, increase the speed to 2 until all the water is incorporated into the dry ingredients. Increase the speed to 4 for a minute or so and then 5 another minute or so.
- When the mixing is complete, the dough should be soft and silky, similar to frosting. Lower the bowl and remove the paddle attachment. With a wet spatula, scrape the dough from the sides of the bowl down into the bowl. Cover the bowl with plastic wrap and set it on the top of your stove for 20 minutes (oven is on and set to 400 degrees).
Prepare Parchment Paper for Forming
- Cut four pieces of parchment paper large enough to accommodate an 8-inch baguette. Set in a stack on your work surface next to the baguette pan. Spray the majority of the top sheet only with non-stick spray.
Scooping and Forming the Baguettes
- Move the bowl of dough to your work area and turn on your scale, set to grams. Put a small bowl on top of the scale and tare to zero. Spray the bowl you will be scooping into, the spatula, and the scooper with non-stick spray. Have a bowl of hot water nearby to dip your hands into.
- Start scooping the dough into the bowl on top of your scale until you reach 250g. If you need to take the dough out of the bowl on the scale, wet your hands before touching the dough. Once you have 250g in your bowl, wet your hands and slid it from the bowl to the sheets of prepared parchment paper.
- On the sprayed parchment paper, start to make a log shape from the dough about a third of the way in from the edge of the paper closest to you. The log should be about 6 or inches wide and about 2 inched deep. You can make it as long or short as you like but start with the 6 inches until you get the hang of forming the baguettes.
- Wrap the edge of the parchment paper over the log and tuck in under the furthest edge. Roll the log encased in the paper forward until you reach the end of the paper. Roll back a few inches and then roll back and forth for about 3-4 turns. When done rolling, more the roll to the one of the open slots on the baguette pan and slowly unroll the baguette until it lands on the pan. You will be leaving the parchment paper under the baguette for baking. Trim off the excess parchment paper.
- Repeat the scooping and forming steps above for the next two baguettes. Once the pan is full, move to the top of the stove and set your timer for 15 minutes.
- Using a second baguette pan, scoop and form the last baguette. Put the pan on top of the stove next to the other pan of baguettes.
Baking the Baguettes
- After your 15-minute timer for baguettes second proof/rise goes off, and before you place them in the oven, use a sharp knife, dipped first into water, and score the top of each baguette 3-4 times. This is optional and you will want to experiment with scoring and not scoring and judge for yourself which option yields the best result. After scoring (or not scoring) place each baguette pan on a rack in the 400 degree oven. Set your timer for 10 minutes.
- When the 10-minute time goes off, rotate the two pans in the oven and set the time to 10 minutes.
- After the second 10-minute timer goes off, removed the baguettes from the oven. They will most likely be done and if you want more color on them, leave them in for a couple more minutes. Or, you can temp them with a probe thermometer to see if they are at 201 degrees. Once the baguettes are out of the oven, transfer the baguettes (without the pan and parchment) to a cooling rack.
Now What?
- Let the baguettes cool considerably before slicing and using. Or, after cooling, freeze for up to six months. When ready to use from frozen, heat in the microwave for about 30-45 seconds. Remove and slice as desired, and put back in the microwave to thaw completely. Remove and toast if desired, or use without toasting.
- The baguettes make terrific sandwiches, subs, French bread pizza, garlic bread, crostinis, and so much more. Enjoy!
4 Responses
I have tried make it this recipe 6 times. The center of the baguette always falls. The first time I followed the recipe exactly. Then tried 20 minutes for the proof and same for the second. Baked them on two different shelves as recipe indicated. Same thing, so increased the proofing time to 25 minutes both times and same result. Check my oven temperature with a thermometer and it’s spot on. Tried making them at 200 g each, same result. Do you have any recommendations? I would appreciate any suggestions you may have. Thanks in advance.
Thanks for reaching out with questions. Answers to a few questions will help me figure this out: When you say the center of the baguette falls, do you mean they go flat evenly or just the center. Are you in a high humidity area? Did they rise well in the oven and then fall when out of the oven? Can you send me a photo of the finished baguettes?
I’ve tried this recipe twice now and both times the baguette rises nice but goes flat during baking. The flavor is EXCEPTIONAL! But it’s a flat bread and slightly doughy. The second time I let it bake to an internal temperature of 210° so it wasn’t as doughy…but it was still flat.
It is cold and dry here in Michigan. The baguette did rise nicely in the oven but fell at the end of baking and even more upon removing from the oven…you could NOT pick them up to move them to the cooking rack, like you show in your excellent video. I watched your video several times to be certain that I followed your every move, which I did, including the water and yeast foaming. I do have pictures but I don’t see how to upload them to you. This truly is the ONLY recipe of yours that I’ve made that hasn’t produced an AMAZING successful outcome…HELP 🥰🥖
THe baguettes are finicky for sure. They are the one recipe I have had the most trouble with. The key is finding the perfect rise time/amount of dough for your environment. I am going to email you and then you can send me the photos you have. Once I look at them I will have some ideas for you.