Bread and pizza were the two things I missed the most when I went gluten-free. I didn’t realize how much of each I ate until I could no longer have them. Over the years, I tried so many brands of gluten-free bread and pizza, and none of them gave me joy. In 2015, Rich and I set out to make our own. Long story short, we succeeded in making delicious pizza crusts and bread, started a company, sold our products in stores and restaurants, lost the company, and now we find ourselves where I think we always really wanted to be: here with our cooking website and YouTube channel.
I love making gluten-free and dairy-free recipes and sharing them with you. From experience, I know this lifestyle can be tough, frustrating, and even devastating at times. My hope is that with my recipes you will experience a little more joy into your life. And having recipes to make delicious bread, pizza, and more, I feel will help in that regard.
That’s why Rich and I decided that we needed to share our baking recipes with everyone, and this is the first recipe of many to come: sandwich bread. Over the last year, we tweaked and improved our recipes, and this bread recipe is the culmination of six years of trial and error, improvements and refinements, I believe this new version checks off all the gluten-free bread needs that I have heard from the gluten-free community:
- Soft, but not gummy
- Sturdy, but not dry and crumbly
- Versatile (can be used for sandwiches, french toast, in a panini press, grilled cheese, etc.)
- Taste like bread (yes, so many brands do not taste like we remember bread tasting)
If you have baked gluten-free bread before, you can probably jump right into the recipe. Even so, you may want to watch the video first. If you are new to gluten-free bread making, I urge you to watch the video before you get started.
This recipe was developed at an altitude of 5,200 in a dry climate so your bread may act a bit differently and you may need to adjust the amount of water or yeast in the recipe. I believe at lower altitudes, you will get more rise than I do here in Denver. And, that is definitely a good thing!
If you have any questions, comments, or concerns when baking this bread, please send me a message here and I will get back to you in 24 hours or less.
Now, go eat something amazing!

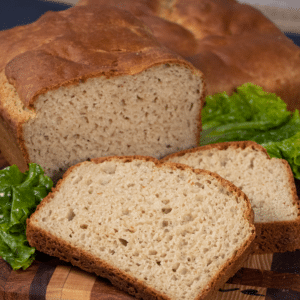
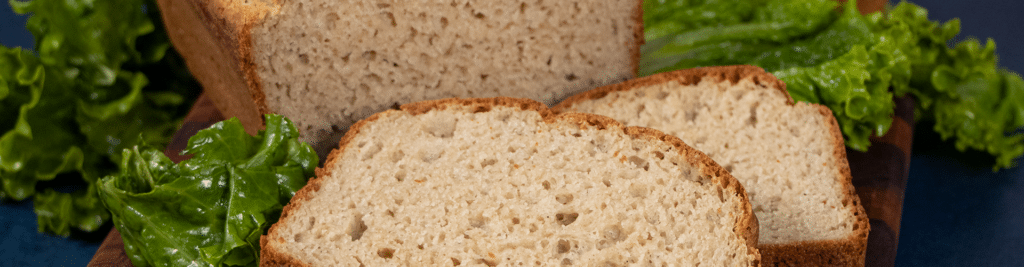
Gluten-Free, Dairy-Free Sandwich Bread
Suggested Tools
The Ingredients
Dry: Flours and Starches
- 90 grams garbanzo flour
- 180 grams sorghum flour
- 210 grams tapioca starch
- 210 grams corn starch
Dry: Supplemental
- 36 grams soy milk powder
- 50 grams sugar
- 15 grams kosher salt
- 9 grams xanthan gum
- 7 grams gelatin, unflavored
- 2 grams baking powder
Wet Ingredients
- 32 grams honey
- 120 grams sunflower oil, can use canola
- 70 grams egg whites, Kirkland brand at Costco is the best!
- 8 grams vinegar, white distilled
- 2 large eggs
Yeast and Water
- 11 grams yeast, dry active NOT instant
- 2.75 cups carbonated water, use club soda or make with a soda stream
The Process
- This recipe makes two loaves of bread.
Getting Ready
- Gather all your ingredients and group by type. Also. gather all the equipment needed for measuring and mixing.
- Preheat your oven to 400 degrees.
Measure the Dry Ingredients
- Measure the garbanzo, sorghum, tapioca, and corn starch and place in the stand mixer's bowl.
- Measure and add the supplemental ingredients to the same bowl as the flours.
Measure the Wet Ingredients
- Measure each of the wet ingredients and then put in a small bowl. All the wet ingredients need to be in one bowl.
Activate the Yeast
- Measure the yeast into a small bowl.
- If using club soda, measure 2.75 cups into a 4 cup measuring cup and heat to 110 degrees in the microwave, about a minute. Use a probe thermometer to test the temperature. If you heat the water to over 110 degrees, wait for it to reach 110 before activating the yeast.
- If using a soda stream, temp the water coming out of your facet to 110 degrees, fill the soda stream bottle, and carbonate the water. Measure 2.75 cups of the carbonated water into a 4 cup measuring cup.
- When you have your 110 degree water ready, begin whisking the water as you add the yeast slowly to the water. Keep whisking until nearly all the yeast has dissolved. You should see foam when you do this. If you do not, your yeast may be out of date or bad.
Time to Mix and Proof (Rise)
- Attach the mixing bowl to the stand mixer, attach the mixer's paddle attachement and raise the bowl into the mixing position. Set to speed 1 for 15 seconds to combine the dry ingredients. Add the wet ingredients while the mixer is still set at speed 1. You will need to use a spoon to get the honey out of the bowl. Now, add the yeast and water slowly. Once it is all added, increase the speed to 2 until all the water is incorporated into the dry ingredients. Increase the speed to 4 and mix for one minute. Increase the speed to 5 and mix for one more minute.
- When the mixing is complete, the dough should be soft and silky, similar to frosting. Lower the bowl and remove the paddle attachment. With a wet spatula, scrape the dough from the sides of the bowl. Cover the bowl with plastic wrap and set on top of your stove for 20 minutes (oven is on and set to 400 degrees).
Scoop and 2nd Proof (Rise)
- Gather your bread pans, small bowl of hot water, #6 disher, kitchen scale, and cooking spray. Set one bread pan on top of the scale and tare to zero. Spray your disher with cooking spray. Scoop dough into the pan until you reach 800 grams of dough in the bread pan. Wet your fingers before you touch the dough to help with the stickiness. Repeat for the other bread pan.
- Shake each bread pan back and forth to distribute the dough evenly. Using fingers dipped in water and then shaken off, smooth the dough on the top if it looks uneven or is climbing up the side of the pan. Cover each pan with plastic wrap and place on top of your stove for 15 minutes.
Baking the Bread
- Put both bread pans into the 400 degree oven on the same rack (in the middle) side by side. Bake for 25 minutes. Every oven is different your bread may take more or less time to bake. At 25 minutes, insert a probe thermometer to temp the bread. The bread is done when it temps at 201 degrees. If the bread is not yet at 201, leave the probe in and close the oven and when the temp hits 201, remove the bread to a cooling rack.
Cooling, Slicing, Storage, and Reheating
- After five minutes of cooling you can remove the bread from the pans. Leave on the cooling rack to cool before you slice. Do not slice the bread when it is hot. After about 15 minutes or so you can put it in the freezer for about 15-30 minutes to expedite the cooling process. Or, leave on the cooling rack until it is cool enough to slice. Use the bread slicer to slice the bread.
- Store in the fridge for up to one week and in the freezer for up to three months. If storing in the freezer, take out the number of slices you need each time rather than defrosting the entire loaf. They will break apart easily when frozen.
- Put the frozen slices in the microwave for 30-45 seconds or until heated through and soft. Eat straight out of the microwave or toast. Enjoy!
One Response
I watched your video & printed the recipe. My hubby was diagnosed with Celiacs in his early 60s nearly 20 years ago, so this has been quite a journey! We have discovered that all 3 of our daughters have problems with gluten to different degrees. Our youngest is 40 & became an invalid over 10 yrs ago; we are her care-givers. The reason for sharing this info, is because I’m going to ask a question……..that I probably know the answer to, already. She has been showing signs of an allergy to sorghum recently. It there any other flour that you think might work in place of sorghum? Since this is the main flour, I suppose this is a crazy question!!!!
I will certainly make this for my hubby, and if you have any suggestion as a sorghum replacement, I’d be willing to try that for Becky.
Thank you for sharing your recipe!!!!!!