Oh, pizza, you started this journey for us. Gluten-free pizza crust was the reason Rich and I, two non-bakers became bakers. We loved pizza so much and there weren’t any premade gluten-free crusts or mixes that came close to the conventional pizza I used to love and Rich could love as much as the real thing. So, we decided to create our own.
Seven years later, we are sharing the recipe with you. This updated and improved recipe is even better than the version we baked when we won the International Pizza Challenge (Gluten-Free Division) in 2016. It has been perfected for home baking and we hope you and your family enjoy it as much as we do.
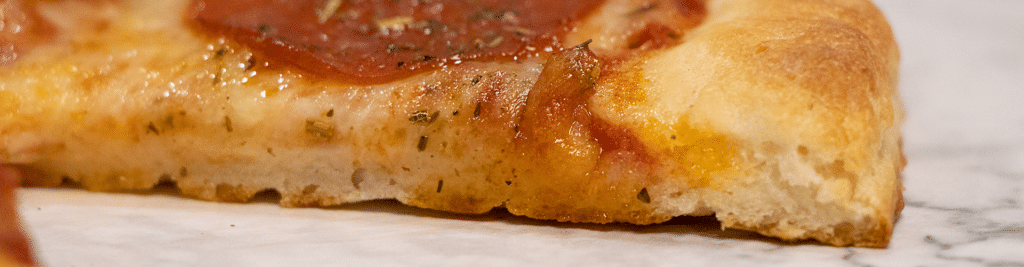
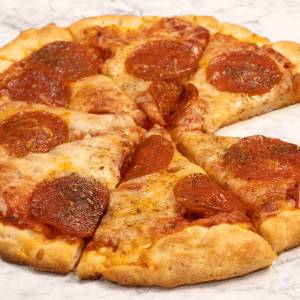
Our gluten-free pizza crust is crispy on the outside, chewy on the inside with a bready, yeasty flavor. It can stand up to high heat and you can even do the final bake in a pizza oven!
This recipe makes 4 crusts. You can make two for dinner and freeze the other two for later. Or, if you’re really hungry or have a larger family, eat them all for dinner!
Remember that altitude and humidity affect any baking so you may need a bit more water, or more or less bake time.
If you have any questions about the gluten-free pizza crust-making process, please message me here and I will respond within 24 hours.
And, for pizza topping ideas, be sure to check out our Pizza Toppings Matrix and our Homemade Pizza Sauce Recipe.
Now, go eat something amazing!

Don’t miss the recipe video at the bottom of the recipe! And, if you like our videos, please subscribe to our YouTube channel HERE!
Gluten-Free, Dairy-Free Pizza Crust Recipe
Suggested Tools
The Ingredients
Dry: Flour and Starch
- 308 g rice flour, White
- 172 g Tapioca flour
Dry: Supplemental
- 40 g soy milk powder
- 12 g xanthan gum
- 10 g gelatin, unflavored
- 2 g baking powder
- 31 g sugar, granulated
- 10 g kosher salt
Wet Ingredients
- 45 g sunflower oil, Healthy Harvest Brand
- 136 g egg whites , (100%, no fillers) Kirkland brand from Costco
- 7 g distilled white vinegar
Yeast and Water
- 8 g dry active yeast, NOT instant
- 1.75 - 2 cups carbonated water, you may need more water than 1.75 cups depending on the area you live
The Process
Mise en Place
- Prepare for baking by setting out your tools: bowls for measuring, mixer, parchment paper, sheet pans, carbonated water (or soda stream), 10" round to make circles, whisk, measuring cup, mixer with paddle attachment, non-stick spray, scooper, and spatula.
Prepare and Preheat the Oven
- Rearrange the two racks in the oven: Place one rack at the very top slot. Skip a slot and then place the second rack in the next slot. Set your oven to 400 degrees.
The Dry Ingredients
- Measure the rice flour and tapioca into the stand mixer bowl. Measure and add the supplemental ingredients to the same bowl as the flours.
Measuring the Wet Ingredients
- Measure each of the wet ingredients and then put in a small bowl. All the wet ingredients need to be in one bowl.
Measure the Yeast
- Using a small bowl and a kitchen scale set to grams, measure out 8g of dry active yeast. Make sure the Tare (clear) after you set the bowl on top of the scale.
Prepare the Water
- If you are using a Soda Stream for your water:As the warm water is flowing from the facet, put a probe thermometer in the stream and when it reaches a steady 110 degrees, fill your Soda Stream bottle and then carbonate the water using the Soda Stream.Add 1.75 cups of the carbonated water to a 4 cup measuring cup.
- If you are using Club Soda for your water:Add 1.75 cups of Club Soda to a 4 cup measuring cup, preferably glass.Microwave for 3 minutes, then temp the water using a probe thermometer. Heat longer if needed to bring the Club Soda to 110 degrees.
Activate the Yeast
- When you have your 110-degree water ready, begin whisking the water as you add the yeast slowly to the water. Keep whisking until nearly all the yeast has dissolved. You should see foam when you do this. If you do not, your yeast may be out of date or bad.
Time to Mix and Proof (Rise)
- Attach the mixing bowl to the stand mixer, attach the mixer's paddle attachment and raise the bowl into the mixing position. Set to speed 1 for 15 seconds to combine the dry ingredients. Add the wet ingredients while the mixer is still set at speed 1. Now, add the yeast and water slowly. Once it is all added, increase the speed to 2 until all the water is incorporated into the dry ingredients. Increase the speed to 4 and mix for three minutes. If the dough appears dry, lower the speed of the mixer and add a bit of water.
- When the mixing is complete, the dough should be soft and silky, similar to frosting. Lower the bowl and remove the paddle attachment. With a wet spatula, scrape the dough from the sides of the bowl. Cover the bowl with plastic wrap and set it on the top of your stove for 20 minutes (oven is on and set to 400 degrees).
Make the Circles While the Dough is Rising
- Cut four pieces of parchment paper sized to fit the 18x13 sheets pans you will be using. Using the curly side up, trace the 10" bowl, dish, or similar with a sharpie, remembering to add a checkmark so you can tell if the sheet has been flipped. Place the parchment paper with the side you traced the circle face down on the sheet pan.
- Spray the parchment paper around the circle and in the middle. You do not need a ton of spray but make sure it is well coated. Repeat the steps above for each sheet of parchment paper and set trays aside.
Scooping the First Two Crusts
- Move the bowl of dough to your work area and turn on your scale, set to grams. Put a small bowl on top of the scale and tare to zero. Spray the bowl you will be scooping into, the spatula, and the scooper with non-stick spray. Have a bowl of hot water nearby to dip your hands into.
- Start scooping the dough into the bowl on top of your scale until you reach 260g. If you need to take the dough out of the bowl on the scale, wet your hands before touching the dough. Once you have 260g in your bowl, wet your hands and slid it from the bowl to one of the sheets of prepared parchment paper. Scoop and measure out the second dough ball and add to another sheet of prepared parchment paper.
Forming the First Two Crusts
- Bring one sheet of parchment and dough to your work area. Make sure your bowl of water is nearby.
- With wet hands, pick up the dough ball and manipulate in your hands to make the dough ball more compacted.
- Using both hands, "throw" the dough ball down in the middle of the circle on the parchment paper.
- Slowly, using one hand with a light touch, spread the dough to extend about a half-inch beyond the circle. You can use two hands if you like.
- Once the dough is spread, run your hand over the top surface to smooth out any unevenness.
- Using the side of your hand pressed against the parchment, push the dough inside the circle about one-half inch. Rotate your parchment paper as you go.
- Using your left hand on the inside of the dough's edge and your right hand following the circle mark, lightly push the dough out to the edge of the circle.
- Make a final pass with your hand over the center to make sure you are level.
- Grab the parchment paper and crust using the two opposite corners of the paper and place on the sheet pan.
- Set sheet pan on top of stove/oven.
- Form the second crust like above.
- Once both crusts/pans are on top of the stove/oven, set a timer for 5 minutes.
Forming the Last Two Crusts
- Using the same process as the first two crusts, form the next two. By the time you are done, the first two crusts should be ready for the oven.
Parbaking the First Two Crusts
- After your five minute timer for the first two crusts goes off, place one sheet pan on each rack in the oven. Set the timer for 7 minutes.
- When the 7-minute time goes off, rotate the two pans in the oven and set the time to 7 minutes.
- After the second 7-minute timer goes off, removed the crusts from the oven, and slid the parchment and crusts onto a cooling rack, leaving the sheet pan behind.
Parbaking the Last Two Crusts
- Once the first two crusts are out of the oven, place the second two crusts in the oven and set the timer for 7 minutes. After the timer goes off, rotate the crusts and set a time for 7 more minutes. When that timer goes off, remove the crusts from the oven and set them on a cooking rack.
Now What?
- If you are planning to make a pizza right after parbaking the crusts, let them cool for about 10-15 minutes, top the pizza, and then bake on a pizza stone or sheet pan for 12-15 minutes, or until they achieve the desired crispiness.
- If you are planning to freeze any of the crusts for later use, make sure they are cooled completely. Once cooled, they can be stacked and placed in a freezer bag. Make sure you lay them flat in the freezer.
Video
Notes
Find Knox Unflavored Gelatin at your grocery store. If you have any questions, comments, or concerns when making pizza, send me a message: https://gfexplorers.com/makingpizza/
20 Responses
Do you have a low carb version of this pizza crust? It sounds divine!
Thank you
Thanks for your comment. Sorry, I don’t have a low carb version. You may want to search for a cauliflower recipe for a good low carb gluten free pizza crust. Thanks!
When replacing the rice flour and tapioca flour with Bob’s red mill, do you still need the rest of the supplemental ingredients? I am super excited to try this crust!!
Hello! Thanks for your question. You do not replace anything, you use rice flour and tapioca as stated in the recipe as well as all the other ingredients. I recommend Bob’s as the brand of rice flour and tapioca flour to use. Do not use Bob’s AP flour, use the separate flours instead.
Your crust sounds amazing, but I have a problem. I have no kitchen scales (nor several of the other specialized gadgets), I don’t understand metric, my only mixer is a hand mixer, and I would only want to make half a recipe, as I have no available freezer space. Any way you could translate this recipe into cups and tablespoons? I’m a pretty good baker and I think I could figure things out from there.
Marinell, thank you for your comment. If I could convert the recipe to Imperial Measurements and know that it would turn out as I have designed, I would, but I can’t. I bake using grams for a reason and that is reason is preciseness, which is critical in yeast-risen gluten-free baking. You don’t need to know the metric system to bake in grams. The scale does all the work. Both Walmart and Amazon has digital kitchen scales for as low as $10. And, if you want to divide the recipe in two, you will definitely need to be working in grams. Otherwise, you will be trying to measure out a 1/16 of a teaspoon or similar for some of the ingredients.
I am allergic to sunflower, what oil would you recommend. I cook using painly olive oil.
Thanks for your question! I would replace the sunflower oil with canola oil rather than olive oil. I think olive oil may be too heavy. Thanks! Victoria
My none GF pizza dough can also be used for bread rolls and cinnamon rolls. As my daughter has Celiac, could your pizza dough be used for other things such as those mentioned?
Thanks for your comment. I have not made cinnamon rolls with the pizza crust recipe yet (it’s on my list!) and I think it would work out well. For bread rolls, I would use the French bread baguette recipe instead of the pizza crust recipe. And the French Bread recipe would probably work well for cinnamon rolls too. https://r7p.d98.myftpupload.com/gluten-free-dairy-free-french-bread-baguettes/
I made this Crust, I like the “Chew” factor, This was my first experience cooking in grams, I generally convert recipes to cups/tea/tbsps.
I didn’t want to use all that White Rice flour, so I substituted 150g of Sorghum flour and and 158g Brown Rice flour for the 308g of White Rice Flour,
I also used “real” eggs instead of packaged whites, It took me just shy of 4 eggs to get the 136g of egg whites.
(rather than waste the yolks, I boiled water in a sauce pan and added the egg yolks and extra white to the pan as I cracked them
and cooked them for a few minutes, when done, I drained off the water, and saved the cook yolks to add to a batch of dog food).
I used dry goat milk sub’d for the dry soy milk and I used grapeseed oil. I’d read a note on here about not using olive oil.
I purchased packages of Yeast to make this because I usually use instant yeast and this called for Active yeast instead,
but my scale read 6g of yeast in one package, so I had to open a second one.
Next time, I will try it with the single package, I am betting that would be sufficient.
By the looks of your video I believe my crust turned out like yours with my substitutions.
It was really good. Thanks for sharing your recipe. ~Wendy
Wendy, thank you so much for your comment! I love that you made it your way!! Grapeseed oil is a good choice. You can use olive oil and it will work. I just don’t like the extra bit of heaviness it adds to the crust but you may. For the yeast, we are here at 5,280 feet in altitude and need extra yeast but if you are at sea level or a bit higher I do think you could get away with less yeast.
If you choose to freeze the additional crusts, what are the cooking instructions? Do you thaw? Add toppings to frozen crust? Cook time? So excited to try this recipe.
Thank you Thank you for this recipe!!! I have tried so many gluten free pizza crust recipes and been so disappointed. This is absolutely delicious! Your instructions were so good that it came out perfect the first try. I am going to stock up the freezer.
Thank you so much Domenica!! I am so happy you now have a GF pizza crust you love. Live without delicious pizza is just not as good!
This crust was absolutely delicious! Hubby says it’s the best I’ve ever made….and we are not gf…trying it for my daughter who is. Thank you for sharing. I was wondering if there’s a substitute for the xanthan gum? I’m on a low sodium diet and xanthan gum adds a lot of sodium to the crust. I substituted the baking powder with one that is sodium free….just wondering about the other. Thanks!
Kim, thank you so much for your comments! There are quite a few replacements for xanthan gum and although I have not tried them, I feel they will work just fine. Here is a link for more information: https://www.healthline.com/nutrition/xanthan-gum-substitute
Is it okay to half the recipe?
Yes, that should be fine. It may take less or more water hold back a 1/2 cup when you activate the yeast and add it in if needed when you mix. Thanks for your question! Victoria